I don’t eat turkey often enough to tire of it (except when offered as a lunch meat, which I don’t care for anyway), so when Thanksgiving rolls around, I’m really hungry for it. The most important aspect of roasting turkey is a juicy white meat. Here’s how I achieve that, and other comments.
My techniques here come from a variety of sources, but some of the rather more salient ones, like brining, originate with Alton Brown, one of my principal influences.
Commercially frozen (whole) turkeys are cooled down below 0° F because turkeys don’t freeze at the same freezing point as water even though they, like us, are mostly water. They will keep months at this temperature and, if you’re not very discriminating and the package isn’t ripped, a couple of years.
So-called refrigerated turkeys are in fact “frozen” down to just below freezing (32° F), but don’t feel frozen to the touch. These are the little gems you run to the store to purchase at a higher price on Thanksgiving Eve because you either totally forgot to thaw the bird in your freezer or, like me, you thought you could thaw it in the little wet bar refrigerator in the family room (apparently, you canot do it in the time suggested in the table below).
If you have a fresh turkey it’s because you know someone or have gone to some trouble to locate one. Perhaps you took a drive out to the country. Good for you!
Thawing
Get your frozen turkey into the refrigerator 3-5 days before you want to roast it. Use this table, supplied by one packing plant (Norbest). If you plan to brine the bird, make certain your turkey is thawed by the eve of the day you intend to roast and serve it. You will read more about this in a moment.
Thaw your turkey on a half-sheet baking pan to avoid drips in your refrigerator. Caution: the small wet bar refrigerator you have downstairs is not suitable for this task. For some reason, your bird being the only thing inside a small space maintained under 40° will make the process a lot longer. These times are given for the bird sharing your main refrigerator and all that’s going on in it.
| Weight (lbs) | Days to thaw | ||
|---|---|---|---|
| 8-12 | 1-2 | ||
| 12-16 | 2-3 | ||
| 16-20 | 3-4 | ||
| 20-24 | 4-5 |
Brining
As discussed on my meat page, brining is a technique for making and keeping otherwise dry meat like turkey and chicken breast moist and tasty. In the case of a small fowl like chicken brining must not be done for a long time as it will render the flesh too salty to eat. The turkey, however, is much bigger and has skin, so it needs and can endure much longer bringing times. Basically, I brine my turkey overnight in preparation for an early morning romp in the oven.
There is danger, however, in brining. In order to avoid the development of too much unpleasant microbial activity in fowl, it can only be refrigerated a short time and always well under 40°. Plus, on the eve of a a great feast involving turkey, your refrigerator is doubtless full of many other delectibles and giving over room to a monster-sized brining turkey, even if you have a vessel that will hold it, is probably out of the question.
The answer is a 5-gallon bucket, camper cooler (like a Coleman®) or one of those cheap, disposable styrofoam coolers you buy for a picnic. Fill it with the bird, a brining solution and enough ice to keep the bird under 40° all night long. If it’s a cold night, as it usually is around Thanksgiving time, put it outside somewhere cats can’t get at it too. I would suggest the garage.
I always buy a 25-lb turkey and I always brine it overnight with ice in a 5-gallon bucket with a lid outside on my deck.
The principal ingredients of a brine are filtered water and salt—lots of it. Anything else is just added flavor. The chemical imbalance between the flesh and the salt causes salt, flavorings and, especially, water to enter the meat. This occurs because the brine is saltier than the flesh. As conditions always seek equilibrium (remember your high school chemistry here), an exchange will take place if not inhibited to make the flesh as salty as the brine, but it will be a dynamic one with the brine solution going in and out of the flesh carrying with it anything tasty you put in and with a net gain in water content.
There is a theory propounded by the folks at America’s Test Kitchen that adding aromates to the brine is ineffective because of the molecular power of salt taking preeminence over it. But, their work was centered upon the chemistry of smoking meat and not simultaneous aromatization.
Whatever the case, here is an example of a brine. I only and always brine in water, salt and a bit of molasses.
| ¾ cup | kosher salt | |
| ¼ cup | molasses | |
| — | fresh-ground pepper | |
| — | thyme | |
| — | tarragon | |
| — | whatever! |
Roasting
Plan to roast your turkey so that it can sit at least 15 minutes before you need to serve it. So, determine the hour at which you wish your guests to eat their main course, subtract 15 minutes, subtract the length of time you require to carve it (non-trivial), and subtract roughly the number of hours your bird will require to roast per the following schedule. While I never suggest stuffing the bird, I have included Norbest’s stuffed recommendations here too.
| Weight (lbs) | Hours to roast | ||||
|---|---|---|---|---|---|
| Unstuffed | Stuffed | ||||
| 8-12 | 2¾-3 | 3-3½ | |||
| 12-14 | 3-3¾ | 3½-4 | |||
| 14-18 | 3¾-4¼ | 4-4¼ | |||
| 18-20 | 4¼-4½ | 4¼-4¾ | |||
| 20-24 | 4½-5 | 4¾-5¼ | |||
Despite these times, in my oven and using my method, I average about 75-80% of the listed times in reality (I use a thermometer to gauge this). If your turkey sits a few hours already roasted before your guests get to it, it is not a disaster at all. You can carefully rewarm it in an oven under 200° for up to 20 minutes tightly wrapped in foil if you wish.
Preheat the oven to 500° while preparing the turkey for roasting.
Prepare the turkey for the oven by removing it from the brine, which you will throw out, and thoroughly rinsing it to remove all the salt. You won’t need any more salt from this point on. Dry the bird and introduce under the skin any aromates you wish into the cavities (chest and neck). These might include:
| 1 | whole onion, slashed | |
| — | lemon or other fruit | |
| — | garlic | |
| — | pepper | |
| — | paprika | |
| — | stuffing | |
| — | whatever! |
As already noted, I do not advise the stuffing because of the increased oven time leading to dried-out meat and the potential for failing to raise parts of the turkey to the requisite temperature to avoid dangerous pathogens. Do not, therefore, cram the cavity tightly with aromates and bread crumbs.
Keeping it moist
|
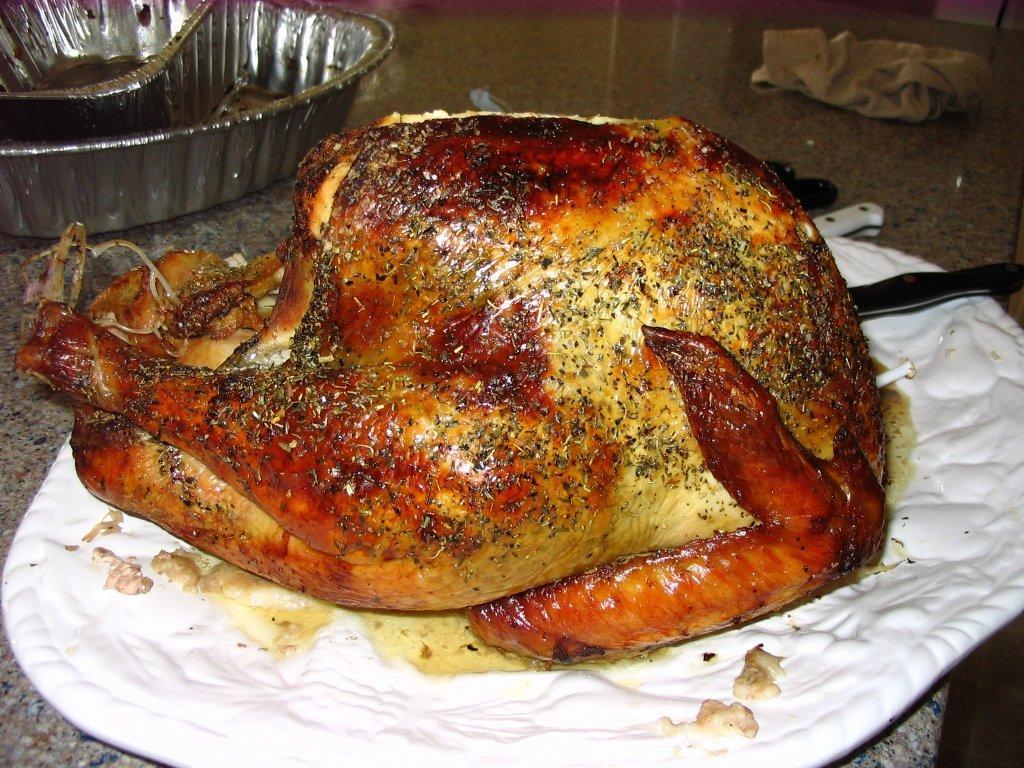
Once the bird is ready, make a triangular, aluminum foil “diaper” to fit over the breast mostly covering it. This will be a shield against cooking the breast too quickly. Coat the whole turkey with olive or another oil, season it with ground pepper, paprika, mustard, etc. as catches your fancy and lay it face down on your rack or in one of those aluminum tubs stores sell for this purpose near Thanksgiving time. Place the turkey face-down in the hot oven for 10 minutes. Remove and turn it over on its back and return it for another 10-20 minutes (depending on size) to brown the skin well. Remove the turkey, drop the oven setting to 325°, then insert the probe of an electronic thermometer from the lower region up into as near the exact middle and center of the breast meat of one side as possible. Do not insert it, pull it out and reinsert it any more than necessary because every hole will leak precious moisture. Do not remove the silly pop-up button button as this will be another opportunity to lose precious moisture from the breast. |
The pop-up deviceThe pop-up in a commercial turkey contains a plastic shaft on a spring epoxied into the plastic body. When the turkey reaches 185°, the temperature at which both the dark meat has begun to release its collagen and 15° past the extermination of anything that could possibly harm you, the epoxy weakens to the point where it gives and the shaft pops up to alert you. The problem with this system, which is mostly installed to protect the packing plant against lawsuits from inattentive or incompetent home cooks, is that breast meat at 185° is dry and nasty. You always wondered and now you know. To be safe, the turkey need only reach 170° throughout. This is what our electronic thermometer is there to tell us. |
Cover the breast of the turkey with the aluminum diaper, return the bird to the oven and close the door cautiously on the cable that connects the temperature probe to its thermometer. Plug in the probe and set the warning temperature to 160° You will take the turkey out of the oven at this temperature because it is in the nature of all meats, especially large pieces, to coast up a good 10° when freshly removed from the oven.
When the turkey arrives at temperature (see chart higher up for an estimate as to when this will be), remove it from the oven and tent it completely with aluminum foil. Wait at least 15 minutes to ½ hour to carve. This allows the meat to tighten up and distribute the juices to their final places.
Carving
It’s difficult to instruct carving by simple text.
First, remove and process the dark meat—wings and thighs. Then carve the breast. A cheap electric knife works very well for this (it’s about the only task a cheap electric knife is good for).
Find the keel or breast bone on the same side. Cut straight down (and parallel to) it and begin following as close to the rib cage as possible. Stop when the wing root is reached. From this point on, you can cut horizontally through the skin (leaving it decoratively attached to every slice you cut) to the first cut you made to produce slices of your desired thickness. Stack them in an attractively staggered pile on your serving platter, then turn your attention to the other breast. Finally, clean up any large chunks of meat left on the carcass and set them aside for serving.
Stuffing or dressing
Okay, let’s talk about this in more depth. I’ve already explained why not to stuff the bird.
One more reason is practicality: you cannot stuff a turkey (or chicken, capon, etc.) with as many servings of dressing as the bird itself will make. So, you would have to bake some separately anyway.
Therefore, get yourself one of those large rectangular foil baking pans with the high sides, one of those see-through cooking bags (for turkeys and roasts), and make all your dressing in a big bowl. Transfer the contents of the bowl to the bag, knot it, then place it in the foil baking pan. Put it in the oven at 350° for 45 minutes or an hour depending on how much liquid you put into it.
I like corn bread stuffing.
Especially if there is any animal product in it (chicken stock, turkey giblets, etc.), you should ensure that its inner temperature reach 170°. In fact, shoving the temperature probe through the bag into the middle of the stuffing and baking until that temperature is reached is a good trick. You can do this before roasting the turkey if you don’t have a second oven as reheated stuffing is usually as good or even better than fresh-baked.